Designing an enchanting backyard path adds charm to your outdoor space. Among various options, gravel paths are attractive, affordable, and easy to build. In this guide, we will explore the factors to consider, installation techniques, and attractive edging options for gravel paths. Whether you prefer gravel, stone, brick, or pavers, we have you covered.
Backyard Gravel Paths
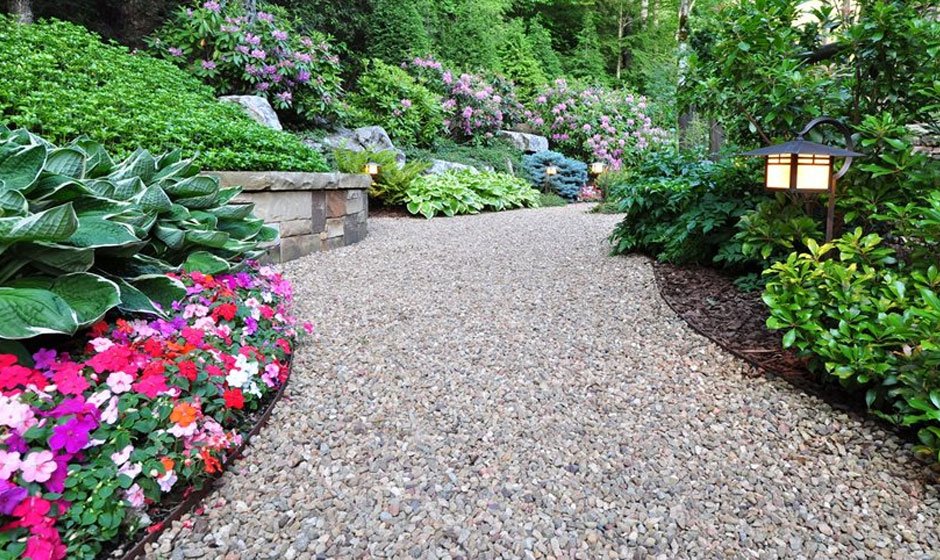
Building a backyard gravel path is a straightforward process. Although these paths have a casual and informal look, you can enhance their appearance by adding a limestone border or exploring other affordable garden path ideas.
Gravel is the most cost-effective and easy-to-handle path material. It provides a soft underfoot feel while being sturdy enough to handle heavy loads. With the addition of a stone border, gravel paths can complement formal gardens as well.
However, it’s important to consider the limitations of gravel paths. They are not suitable for walkways leading directly to your back door, as pebbles may stick to your shoes and make their way into your home. Gravel paths are also not ideal for snowy regions, as shoveling snow off them can be challenging. Additionally, walking barefoot on gravel may not be comfortable. Therefore, it’s essential to evaluate whether a gravel path is suitable for your backyard.
Design Factors
Best Use
Gravel paths are best suited for light to moderate foot traffic.
Longevity/Maintenance
A properly maintained gravel path can last indefinitely. To keep it looking sharp, rake it regularly and pull out weeds. Top-dress it with new gravel every few years to maintain its appearance.
Drainage
Gravel paths do not require special sloping. You can follow the natural grade of your yard but avoid low spots that may collect water. Steep inclines should be avoided, as heavy rain can wash away the gravel. For steps, consider using timbers or stone.
Borders
Including a border in your plans is essential to contain the gravel and maintain a neat appearance.
Materials
Gravel comes in various sizes and colors. It’s important to ask for gravel that compacts well. Typically, it will consist of stones ranging in size from 3/4 inch down to a powder. Smaller stones (3/8 inch) provide better comfort underfoot, while larger stones (3/4 inch) are more resistant to displacement during rainstorms. You can purchase gravel from a landscaping supplier or directly from a quarry.
Borders for Backyard Gravel Paths
Metal edging is a cost-effective and easy-to-install option for gravel path borders. It offers a clean and crisp look. To contain the gravel, set the edging about 1 inch higher than the path and secure it with the provided metal stakes. Metal edging is available in green or brown painted steel or aluminum, typically in 8-foot or 16-foot lengths. You can cut it with a circular saw equipped with a metal-cutting blade or a hacksaw.
Other border options include using stone or brick. For stone borders, fit the stones tightly for a smooth appearance. Install them on a layer of gravel and secure them in place with a rubber mallet. Brick borders provide a traditional style. You can set the bricks either upright at an angle or flat in the ground. Install them in a 2-inch sand bed and surround them with gravel and soil to lock them in place.
Construction Details
Building a gravel path primarily involves using a spade, shovel, and wheelbarrow. Start by flattening the pathway with a spade, removing any sod if crossing a lawn. Set the borders and pour in approximately 3 inches of gravel. It’s important to note that moving gravel can be physically demanding. Enlist the help of a strong individual or a neighborhood teenager. Arrange for the gravel to be dumped on your driveway to save time and effort.
Stone Paths
Stone paths offer a highly decorative and easy-to-lay option. Each stone piece is unique, providing a timeless appearance. Stone is a more expensive path material, but it is relatively easy to install. In most cases, you can set each stone piece on a layer of sand and level it. For areas with higher foot traffic, ensure a tighter fit between stones to minimize the risk of tripping.
Design Factors
Best Use
Stone paths are highly decorative and suitable for light to moderately heavy foot traffic. They may not be ideal for bicycles, wheelbarrows, or lawnmowers. Shoveling snow from the rough and uneven surface can be challenging. Stone paths are versatile and cause minimal disturbance to gardens and lawns. They work well around trees without disturbing the roots, making them a great choice for indecisive gardeners who may want to rearrange the path.
Longevity/Maintenance
Stone pieces can last indefinitely. However, you may need to lift and reset them if they sink or become uneven.
Drainage
For stepping stones, let them follow the natural lay of the land. Water will run off into the joints. If using tightly fitted stones, pitch the path about 1/4 inch per foot to the side.
Slopes
Build stone steps that match the path. Purchase riser stones and large tread stones from the stone supplier.
Material Selection
Common stone types for paths include limestone, granite, sandstone, and slate. These stones come in various colors, sizes, and shapes. You can set them apart as stepping stones or fit them tightly for a more solid pathway. Ensure the selected stones are at least 1 inch thick to avoid cracking.
Construction Details
Setting stones for a pathway is similar to assembling a big, heavy jigsaw puzzle. Start by skimming and flattening the proposed pathway. Then, dump and smooth out a couple of inches of sand as a setting bed. Fitting the stones requires patience. Spread them out, choose the desired pattern, and ensure a pleasing arrangement. The stones can weigh between 60 and 200 pounds, so using a dolly is recommended to move the larger pieces. Fill the joints tightly with sand, soil, or mulch, and consider planting a ground cover in the joints for an attractive appearance and to help hold the soil in place.
Paver Paths
Pavers offer a more formal and durable option for paths. They have a long history, with the Romans using cut stones placed on a gravel bed to create highly resilient roads. Modern pavers are made from concrete, clay, or stone. Installing a paver path requires labor and the rental of a heavy plate compactor for proper installation. However, the result is a permanent, tight-fitting, and relatively smooth path that rivals solid concrete in durability.
Design Factors
Best Use
Pavers are suitable for various applications, including paths, walks, and driveways. They can withstand heavy weight and offer high decorative appeal. With a wide range of colors and patterns available, you can create a formal English garden walk or an ancient-looking cobblestone path.
Versatility
Pavers work well for straight or curved paths. However, once the path is installed with a compact gravel base, making changes becomes a significant undertaking. Exercise caution when using pavers around mature trees to avoid damaging the roots.
Longevity/Maintenance
Paver paths are built to last a lifetime. Regularly sweep off dirt to prevent weed growth and maintain a clean appearance. Every few years, sweep additional sand into the joints to keep the pavers secure.
Drainage
Set the path to drain at a 1/4 inch per foot slope to the side. Position the pavers slightly above the surrounding grade.
Slopes
Pavers can be laid on steep inclines, as long as you can walk up them. However, avoid using them for steps. Opt for stone, concrete, or wood for steps instead.
Materials
Concrete pavers offer the most variety in terms of color and shape. You can arrange them in various patterns, and they have beveled edges for easier fitting and shoveling. Concrete pavers typically last 30 years or more, with slight color fading over time.
Clay pavers, commonly used for streets in the past, are still available in modern versions. They range from soft-textured molded styles to crisper “wire cut” types. Clay pavers offer excellent color retention and durability. Ensure the edges are set evenly, as some types may chip. Be sure to purchase pavers and not softer house bricks, as the latter will deteriorate.
Stone pavers are the most expensive option but provide a timeless and attractive appearance. They are often tumbled to give them an aged look. Stone pavers are extremely hard and challenging to cut, but they offer exceptional longevity.
You can find a wide selection of pavers at landscape, brick, or stone suppliers. Home centers may also carry concrete pavers.
Construction Details
Setting pavers requires repetitive work and is not recommended for novices. Start by excavating a pathway approximately 9 inches deep and filling it with compacted gravel as a base material. Next, lay the edging, spread and level a bed of sand, and place the pavers. Some pavers may require cutting with a saw equipped with a diamond blade. Finally, set the pavers with the plate compactor and sweep sand into the joints.
Required Tools and Materials
Before starting your backyard gravel path project, gather the necessary tools and materials to save time and avoid last-minute shopping trips. Here’s a list of what you’ll need:
Tools
- Circular saw
- Safety glasses
- Spade
- Wheelbarrow
- Dolly
- Broom
- Leather gloves
- Stone chisels
- Mason’s hammer
- Sod cutter
- Plate compactor
Materials
- Gravel
- Sand
With this comprehensive guide, you’re now equipped with the knowledge to plan and construct a beautiful gravel path for your backyard. Enjoy the process of creating an inviting and functional outdoor space that complements your landscape.